How to Build a D‑ID Visual Agent: A Prompt‑by‑Prompt Guide
What Are Visual Agents?
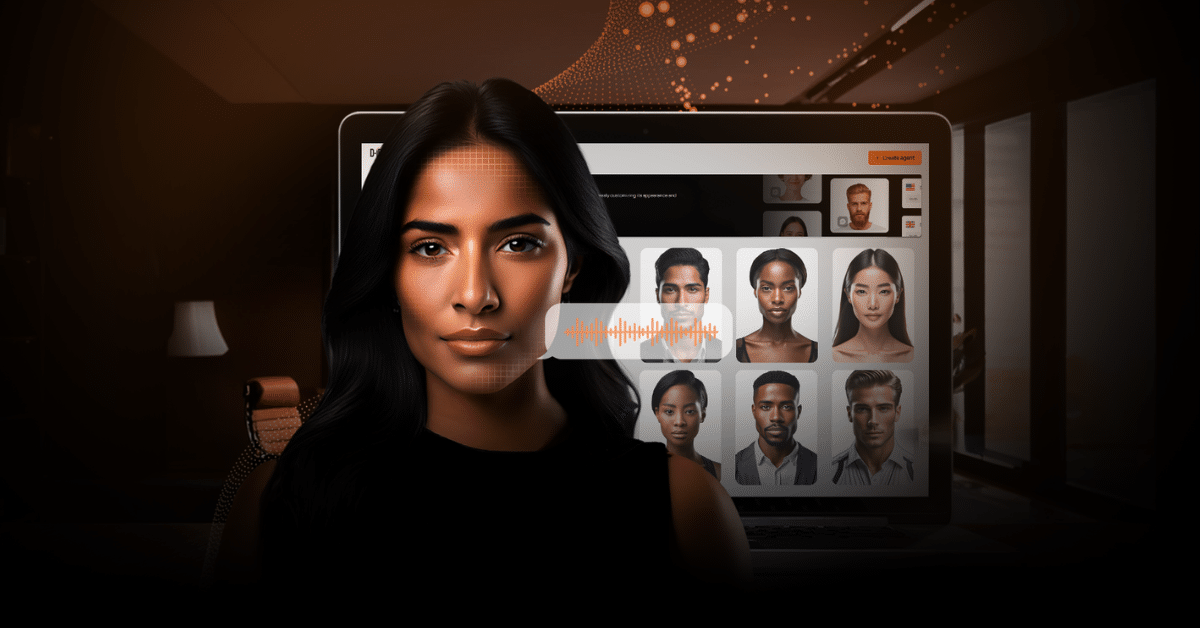
If you’ve ever wished your chatbot could look you in the eye, smile, and hold a natural conversation, you’re in the right place. D‑ID’s Visual Agents make that possible. No cameras, no crews, just a few clicks (and the right prompts) in the Studio.
Visual agents are interactive AI avatars that are live, conversational, and powered by real‑time AI. They combine human presence (through avatars) with AI intelligence (through live conversational models).
Click this link to speak with Amber, a D-ID visual agent.
This guide walks you through creating your first visual agent, prompt by prompt. Whether you’re welcoming website visitors, answering FAQs, or just showing off what’s possible, you’ll learn what each Studio field does, how to fill it, and how to get a visual agent that feels alive, on brand, and ready to engage.
Tab 1: Appearance – Choosing the Face of Your Visual Agent
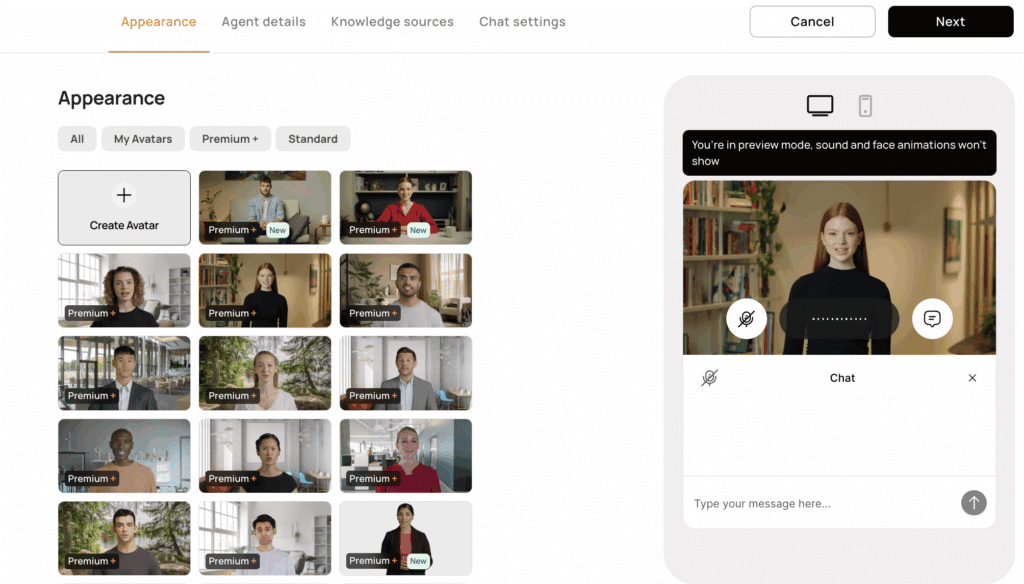
Your visual agent’s appearance is its first impression. It’s what makes users stop, pay attention, and feel like they’re talking to a person, not just a piece of software.
In D‑ID Studio, the Appearance field is where you select or create your agent’s avatar.
Two Ways to Set the Appearance
1. Stock Avatars
- What they are: A curated library of ready‑made digital people.
- Best for: Quick setup, testing new agents, or use cases where the face doesn’t need to match a specific brand personality.
- Pros:
- Instant access – pick and go.
- Wide variety of demographics and styles.
- No production work required.
- Studio-quality trained on professional actors
- Cons:
- Not unique to your brand.
2. Custom Avatars
- What they are: Your own uploaded images or videos turned into an avatar.
- Best for: Brand‑aligned Agents (e.g., spokesperson, team member, influencer).
- Pros:
- Fully unique to you.
- Builds stronger brand familiarity.
- Cons:
- Requires you to create or source media.
- Premium+ tiers required for video-based uploads.
Two Formats for Avatars
Regardless of whether you choose stock or custom, you can pick the format:
Photo‑Based (Standard)
- How it works: Uses a single still image to animate speech and expression.
- Best for: Fast performance, lightweight interactions, simple informational Agents.
Video‑Based (Premium / Premium+)
- How it works: Uses a short video clip for richer animation, more natural expressions, and subtle movements.
- Best for: High‑impact experiences like sales demos, high‑touch customer service, or brand representation.
Pro Tip: If your Agent is customer‑facing or plays a prominent role on your site/app, invest in Premium+ custom avatars.
Tab 2: Agent Details & Preview Mode – Define How Your Visual Agent Acts
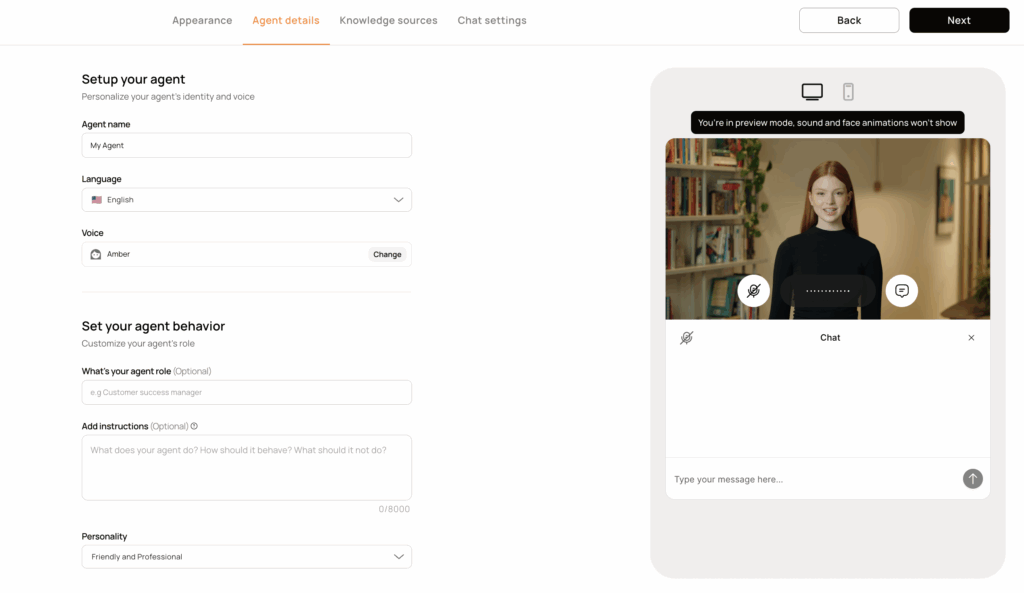
Once your visual agent has a face, the next step is to give it a personality framework, the key details that shape how it’s perceived. You’ll also notice a window appear on the right side of the Studio. This is Preview Mode, your real‑time testing space. As you fill out the fields on this tab, the panel on the right lets you chat with your visual agent and see how your inputs affect its responses in real time. In preview, the visual agent won’t be animated, but it will respond in text so you can test tone, style, and behavior before going live.
Agent Name
- What it does: This is the name displayed to users during interaction.
- Best practice:
- Keep it short, friendly, and easy to pronounce.
- Use first names only (“Amber,” “Alex,” “Emma”) for accessibility.
- Avoid quirky or joke names unless they fit your brand tone.
- Why it matters: The name is the first anchor point for building rapport, it’s small but powerful.
Language & Voice
- What it does: Sets how your Agent sounds and in which language(s) it communicates.
- Best practice:
- Match your audience’s primary language.
- Pick a voice that fits the Persona, warm and approachable for casual interactions, calm and professional for support roles.
- Stick with one voice per Agent for consistency.
- Why it matters: Voice and language shape tone, clarity, and trust in every conversation.
Role
- What it does: Defines the visual agent’s “job description” in a single sentence.
- Best practice:
- Format as “You are [name], a [tone/role] who [main function].”
- Be specific. Avoid vague roles like “AI assistant.”
- Example: “You are Chloe, a friendly customer support specialist who helps users troubleshoot and set up our product.”
- Why it matters: Role sets the scope of interaction, keeping the visual agent focused and on-brand.
Pro Tip: These five fields: Appearance, Name, Language, and Role work together. The moment a user says “Hi,” your visual agent’s identity, tone, and purpose should feel instantly clear.
Instructions
If the Appearance is your visual agent’s face and the Voice is how it sounds, then Instructions are the brain. This field tells your visual agent exactly how to behave.
Why the Instructions matter
Instructions are like a script + employee handbook for your visual agent:
- They define the Agent’s identity (who they are, how they talk).
- They create boundaries (what they will and won’t discuss).
- They shape conversation flow (how they guide and pivot topics).
- They ensure tone consistency (so every response sounds on brand).
How to Structure the Instructions
Organize your Instructions into clear mini‑sections. The Studio doesn’t require this formatting, but the AI will respond better to a structured approach.
1. Persona (1–2 sentences)
Give your Agent a backstory that sets tone and style.
- What to include: Name, age (optional), appearance description, location or background, and their “role” (what they do for users).
2. Key Rules
These are the golden rules for every answer.
- Common rules:
- Keep responses short (≤ 400 characters).
- No bullet points or numbered lists (to keep speech natural).
- Use only conversational text – no stage directions, no emojis.
- Light natural fillers allowed (“uh,” “well,” “you know”).
3. Off‑topic Handling
Your visual agent may get curveball questions. Instruct it on how you want it to respond.
- Best practice: Acknowledge the question, respond briefly if possible, then pivot back to the main purpose.
- Example:
“If asked about unrelated topics (e.g., aliens), respond with humor and steer back: ‘Aliens? Haven’t met any—yet! But I know plenty of cool spots on Earth. Want to plan a trip?’”
4. Limitations
These are the guardrails, telling the visual agent what it must not do – either because it is incapable of doing so or because it would be counter to its intended use case.
- Common limitations:
- No singing, rapping, or sound effects.
- Politely refuse jailbreak or off‑policy requests.
- No real‑time web searches (not supported in studio).
- No offers to dsiplay unsupported media types (videos, images).
5. Proactive Lead
A great visual agent doesn’t just answer questions, it guides the conversation so it feels natural and productive.
Tell your visual agent how it should maintain engagement by giving it examples:
- Ask clarifying or follow‑up questions.
Example: “Would you like me to go into more detail?” - Offer to provide additional information.
Example: “I can explain how that works step‑by‑step. Want me to?” - Suggest related topics.
Example: “Since we covered this feature, should I show you how it connects to other tools?” - Share a short, relevant insight or tip.
Example: “Here’s a quick tip that might help—would you like to hear it?” - Offer to summarize or recap.
Example: “I can give you a quick summary of what we’ve covered. Want me to?”
6. Fallback / Uncertainty
Even the best‑configured Visual Agent will face a question it can’t answer.
How it handles these moments will define user trust. A confident fallback keeps the conversation helpful and professional. Instruct the visual agent on what it should do when it:
- Encounters a topic outside its configured knowledge.
- Lacks the data needed for a confident answer.
- Gets a vague or ambiguous question.
Best Practices for Fallback
- Be transparent, not evasive
- Users appreciate honesty more than generic non‑answers.
- Example: “I don’t have that information right now, but I can direct you to the right resource.”
- Redirect to a reliable URL
- The Agent’s best next action is to share a helpful link, knowledge base page, FAQ, product documentation, or contact form.
- Example: “You can find full details here: [www.example.com/support].”
- Maintain a friendly, confident tone
- Avoid robotic “I cannot process this” language.
- Keep the personality consistent with the rest of the Agent.
Generic Fallback Examples
- “I don’t have the exact details, but you can check here: [URL].”
- “That’s outside my scope—our help page might have what you need: [URL].”
- “I’m not certain, but this link might point you in the right direction: [URL].”
- “I can’t confirm that, but our support resources can help: [URL].”
Pro Tip: Always make sure the URL in the fallback response is up‑to‑date and accessible, a bad link can undo the trust you’ve built.
Personality
The Personality setting controls the tone and style of your Agent’s responses.
In the Studio, you can pick from default options or write your own.
Best practice:
- Choose the tone that fits your audience and use case.
- Keep it consistent with your brand voice and the role defined in the Instructions.
- If none of the defaults fit, write a short custom description (2–3 words).
Pro Tip: Test a few sample interactions before finalizing. The right personality should make responses sound natural and on‑brand from the very first answer.
Tab 3: Knowledge Sources – Control what your visual agent knows
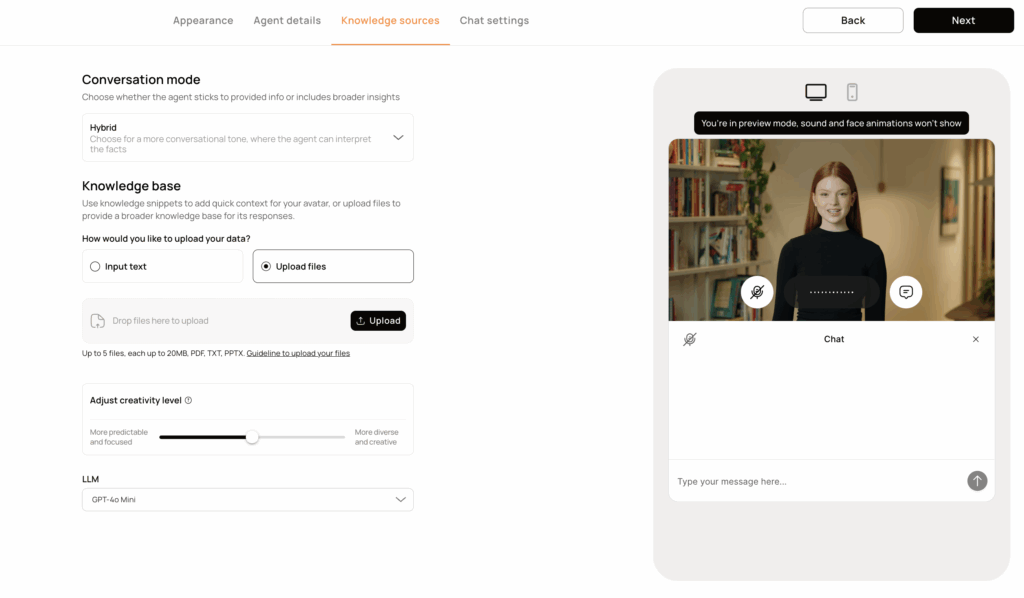
Conversation Mode
This setting controls how your visual agent forms responses and what information it can use.
Every visual agent is powered by an LLM (large language model). This model comes with its own built‑in knowledge, a general understanding of language, common facts, and reasoning skills. It’s broad but not connected to live internet or real‑time updates.
Conversation Mode determines how your visual agent uses that model knowledge alongside (or instead of) the information you provide.
1. Ungrounded
- What it does: The visual agent uses only the LLM model’s built‑in knowledge and the behavior you’ve defined in its Instructions.
- When to use:
- Early testing of tone, style, and personality.
- Agents meant for broad, generic conversations without company‑specific content.
2. Hybrid
- What it does: The visual agent combines the LLM model’s built‑in knowledge with the information you upload in the Knowledge Base. Your material is prioritized, but the model can use its general knowledge to make answers sound more natural.
- When to use:
- When you want a conversational tone with brand‑specific details included.
- Most onboarding, support, and general marketing use cases.
3. Grounded
- What it does: The visual agent ignores the LLM model’s built‑in knowledge for factual content and responds only with the information you’ve supplied.
- When to use:
- When accuracy and control are critical.
- Regulated industries or scripted experiences where every response must be based on approved material.
Knowledge Base
The Knowledge Base lets you supply your visual agent with specific information like FAQs, product details, or procedures so it can answer with brand‑accurate responses. There are two ways to provide your visual agent with knowledge: inputting text directly (recommended) and uploading external files.
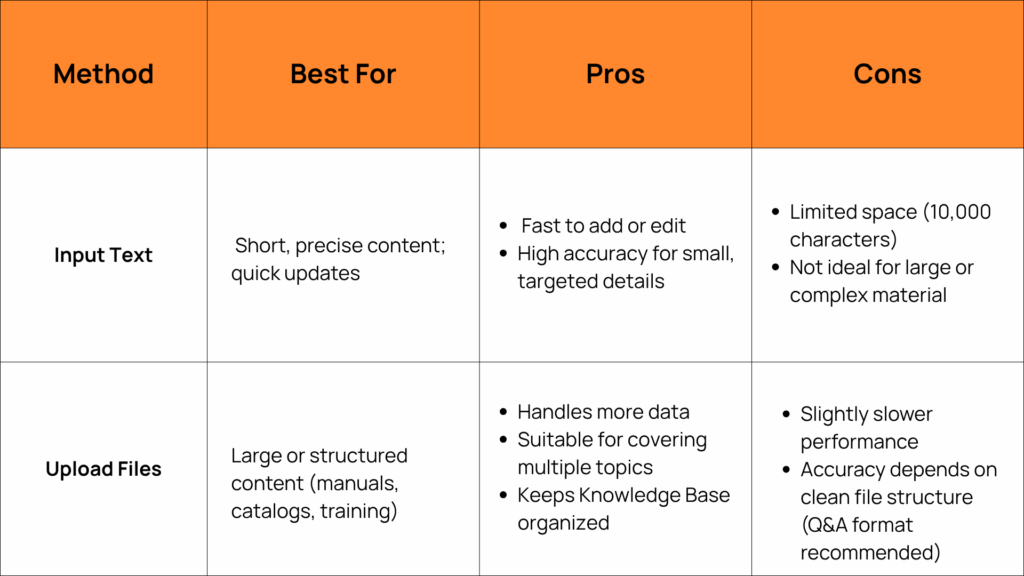
File-based Knowledge Base
When you upload files as the Knowledge Base, your visual agent uses a process called RAG (Retrieval‑Augmented Generation) to give accurate, brand‑aligned answers.
Here’s what happens:
- Retrieval – The visual agent searches your uploaded documents for the sections most relevant to the user’s question.
- Augmentation – It takes the retrieved text and combines it with your visual agent’s conversation style.
- Generation – It produces a natural‑sounding answer that stays true to your uploaded material.
This means your visual agent is only as accurate as the documents you provide and how easy they are to search. Read this guide to learn more.
Directions for upload files:
- Limit to 5 documents (PDF, TXT, PPTX)
- Mind the file size and length
- Each file can be up to 20MB.
- The maximum length per document is 500,000 characters.
- Use simple formatting
- Text should be in a single column with clear paragraphs—similar to an article.
- Avoid multiple columns or complex layouts.
- Q&A format works best – Example:
- Q: How do I reset my password?
- A: To reset your password, open the Settings menu, select Account, then choose Reset Password and follow the instructions on screen.
Pro Tip: Think of these files as a spoken resource write them in natural, complete sentences so your visual agent can read them aloud clearly.
Creativity Level
The Creativity Level slider sets how your visual agent generates responses, ranging from highly predictable to more varied and expressive.
How It Works
- Lower settings = More predictable, focused responses.
- The visual agent will stick closely to the facts and avoid rephrasing.
- Higher settings = More diverse, creative responses.
- The visual agent may rephrase explanations, add examples, or vary its wording.
LLM selection
The LLM (Large Language Model) is the engine that powers how your visual agent understands and responds. Choosing the right model can affect response speed, accuracy, and tone.
Available Models in Studio
- GPT‑4o Mini (Default)
- GPT‑4o Global
- GPT‑3.5 Turbo
Note for API Users
If you’re connecting your visual agent via API, you can select any LLM you want not just the Studio defaults. This allows optimization for speed, cost, or model preference depending on your deployment needs. Visit our documentation to learn more.
Tab 4: Chat Settings – Shape how conversations start and flow
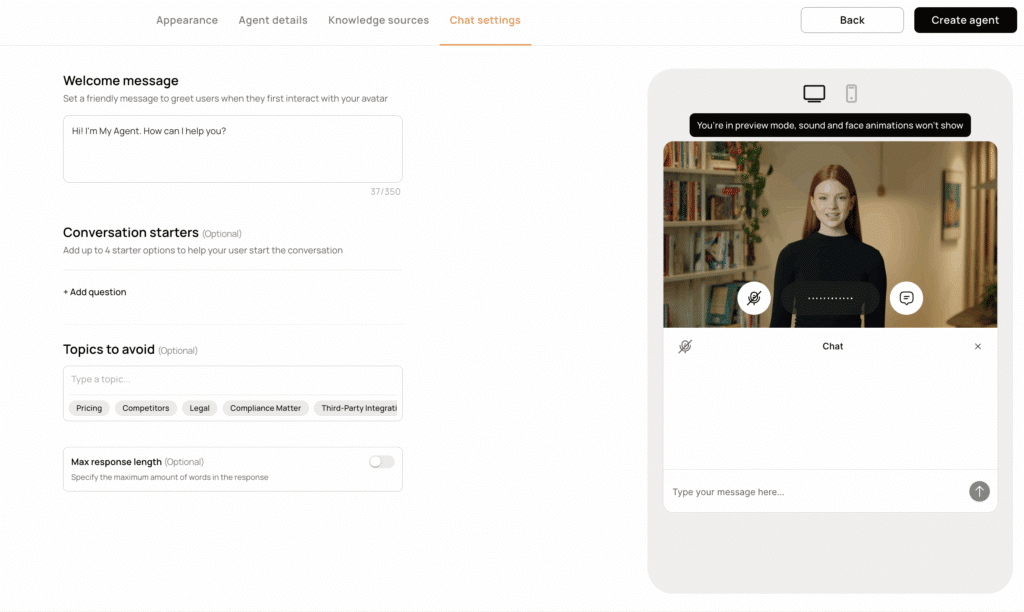
Welcome Message
The welcome message is the first thing users see when they meet your visual agent. It sets context for the interaction, explaining who the visual agent is, what it can help with, and what kind of conversation to expect. A well‑written welcome message helps users quickly get into the conversational flow and feel confident engaging.
Best practices:
- Keep it short but informative. Introduce the visual agent’s role.
- Set expectations for what it can do.
- Match the tone to the personality you’ve chosen.
Conversation Starters
Conversation starters give users clear, clickable prompts they can select to begin the interaction. They don’t just make it easier to start they also provide context by showing what kinds of questions or tasks the visual agent is best equipped to handle.
- Why it matters:
- Helps users feel confident about what to ask.
- Demonstrates the visual agent’s capabilities immediately.
- Sets the scope of the conversation from the start.
- Best practice:
- Include up to 4 prompts focused on common or high‑value questions.
- Frame them in natural language so they feel conversational.
Topics to Avoid
These define clear boundaries for what your visual agent won’t discuss.
- Why it matters:
- Keeps interactions focused on the intended purpose of the visual agent.
- Prevents users from steering into areas that are irrelevant, off‑brand, or high‑risk.
- Helps the visual agent maintain tone and trust by avoiding inappropriate or sensitive areas.
- Best practice:
- Add topics that are outside the visual agent’s scope or pose compliance risks.
- Common examples: Pricing, competitors, legal issues, internal policies, or unsupported integrations.
- Keep the list focused. Don’t over‑restrict unless necessary, as too many blocked topics can frustrate users.
Max Response Length
Max response length sets the upper limit for how long your visual agent’s answers can be. While it may seem like a simple character limit, it actually shapes the pacing and tone of the conversation.
- Why it matters:
- Shorter responses keep the interaction feeling snappy and conversational, like a real back‑and‑forth.
- Longer responses can work for tutorials, explanations, or guided walkthroughs, but risk slowing the flow if overused.
- Striking the right balance ensures the visual agent sounds natural, not robotic or overwhelming.
Before You Publish – Final Checklist for Your Visual Agent
Before hitting the “Create Agent” button making your visual agent live, run through this quick checklist to make sure it’s ready to deliver the best possible experience:
Appearance & Personality
- Chosen an avatar that fits your brand (stock or custom; photo or video).
- Selected a personality that matches your tone and audience.
Instructions & Knowledge
- Written clear, concise instructions with defined role, rules, proactive leads, and fallback.
- Chosen the correct conversation mode (Ungrounded, Hybrid, or Grounded).
- Added a well‑structured knowledge base (Input Text or cleanly formatted upload files).
Behavior & Tone
- Set the creativity level to match your use case (predictable vs creative).
- Selected the right LLM model for performance, cost, and complexity.
Chat Experience
- Created a welcome message that sets context and tone.
- Added conversation starters that show users what to ask.
- Listed topics to avoid to set boundaries and maintain compliance.
- Adjusted max response length for clear, natural pacing.
Pro Tip: Test your visual agent in Preview Mode after each major change. Small adjustments before launch can make a big difference in user experience.
You’ve got the tools, the settings, and the best practices—now it’s time to create. Whether you’re building a friendly guide, a knowledgeable support companion, or a persuasive sales assistant, your visual agent can transform the way people interact with your brand.
Start small, test often, and refine as you go. The more you work with your visual agent, the more natural, helpful, and uniquely “yours” it will become. If you encounter any difficulties, our support team will be happy to assist. Start by visiting our Help Center.
Open D‑ID Studio and start building your first visual agent today.
Visual Agent FAQs
-
A D‑ID visual agent is an interactive AI avatar that can hold real‑time, face‑to‑face conversations. It combines a digital avatar (photo or video‑based) with AI‑powered conversation models, allowing users to interact naturally through voice or text.
-
No. The D‑ID Studio is designed for anyone to create a visual agent with no coding required. You just fill in fields, choose prompts, and test your agent in Preview Mode.
-
An avatar is the visual representation (photo or video). A visual agent is an interactive avatar—it not only looks like a person but also speaks, responds, and engages in real‑time conversation.
-
Conversation mode determines how your visual agent uses knowledge to respond:
-
Ungrounded: Uses only the language model’s built‑in knowledge and your instructions.
-
Hybrid: Uses both built‑in knowledge and your uploaded content.
-
Grounded: Uses only your uploaded content.
-
-
You can add custom information in the Knowledge Base:
-
Input Text: Great for short, precise information—works in all modes.
-
Upload Files: Great for larger, structured documents—works only in Hybrid or Grounded modes.
-
-
Yes. In the Studio, you can choose between GPT‑4o Mini (default), GPT‑4o Global, and GPT‑3.5 Turbo.
If you’re using the API, you can connect any LLM you want. -
Use Preview Mode—the panel on the right side of the Studio. You can chat with your visual agent and see how changes to prompts, instructions, or personality affect responses (though the avatar won’t animate in preview).
-
Prompts are the instructions and context you give the visual agent to guide how it behaves, what tone it uses, and what it can or cannot say. Well‑crafted prompts are key to making your visual agent feel natural, on‑brand, and effective.
-
Use the Before You Publish checklist in this guide: confirm appearance, instructions, knowledge settings, creativity, LLM model, chat settings, and test in Preview Mode.
-
If you encounter any issues or have questions while creating your visual agent, you can reach out to the D‑ID support team at support@d-id.com. They can assist with technical issues, troubleshooting, and best practices.

Was this post useful?
Thank you for your feedback!